The stature lengthening surgery consists of an osteotomy (surgical cut to the bone) that will separate the bone into two segments and insertion of the lengthening nail (the PRECICE).
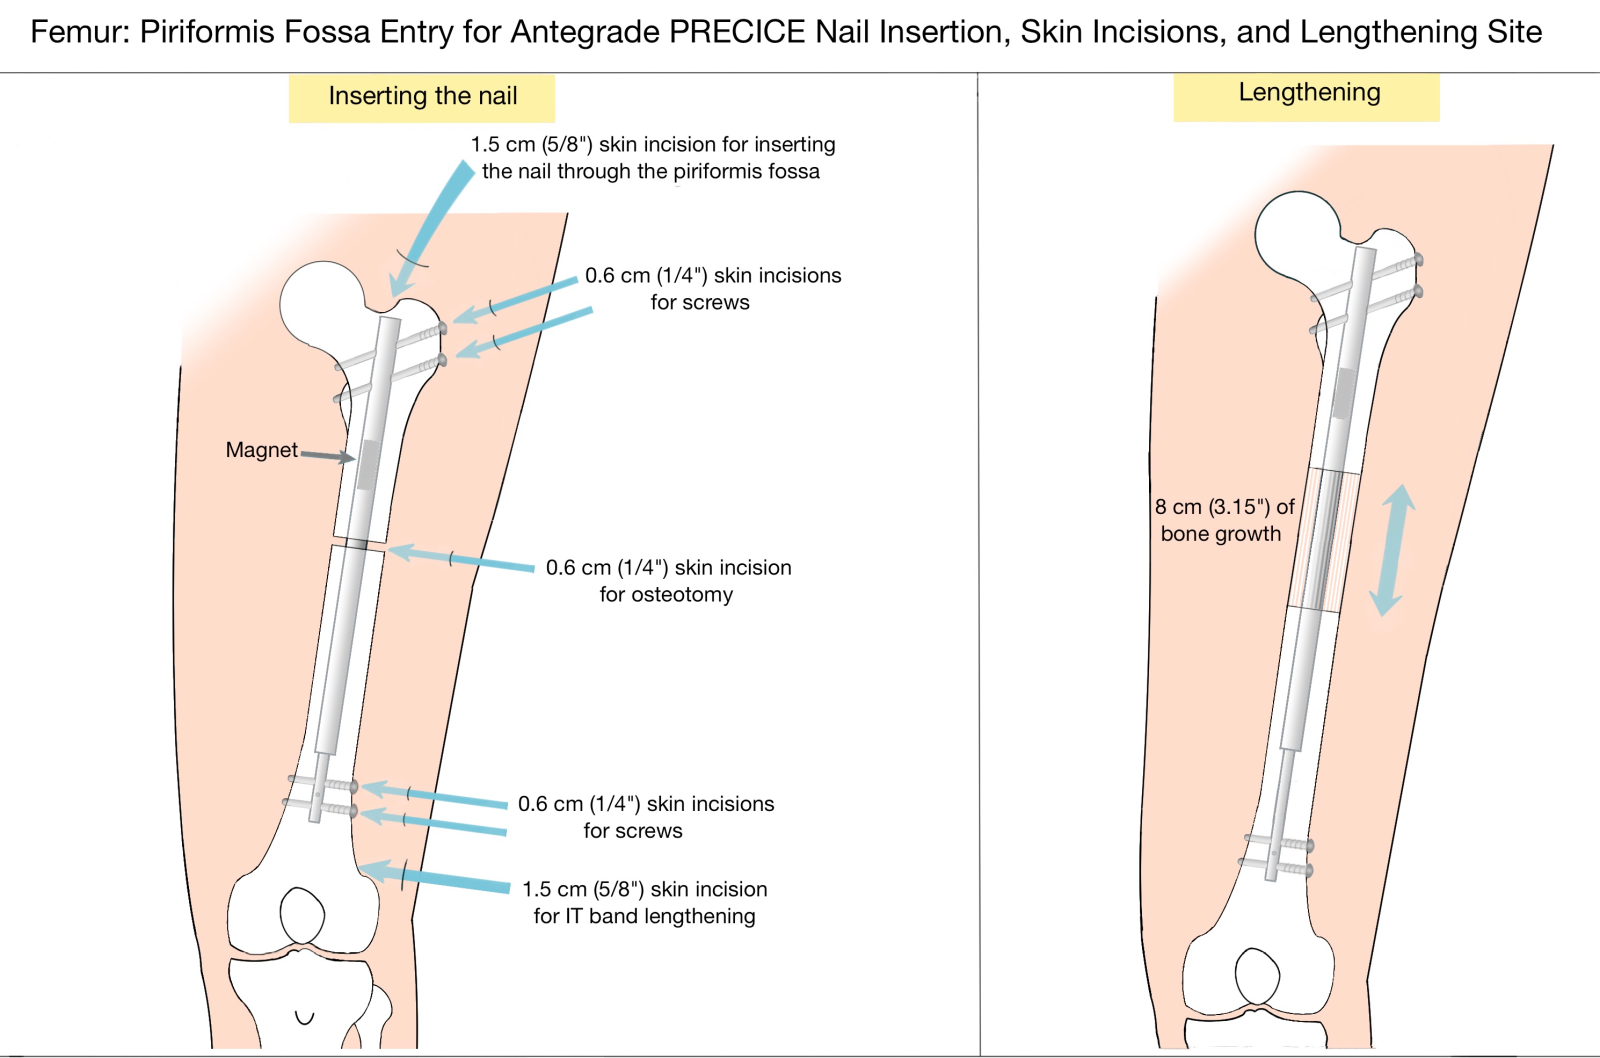
There are many things that the surgeon must consider for stature lengthening surgery. It is important to determine the ideal nail length, insertion point (e.g. trochanteric vs. piriformis), osteotomy level, and direction of the nail (antegrade vs. retrograde). The nail length and osteotomy level are very interrelated. To avoid too much friction, the osteotomy level is planned to leave one to three centimeters of the wider tube of the nail engaged in the opposite segment of bone (this is explained in detail below). When there is a larger femoral bow, we prefer to make the osteotomy at the level of the apex of the bow. Working backwards, this can help calculate the ideal length of the nail to use. In most cases, a relatively short nail is used compared to nailing for fixation of fractures. The femur can be reamed with flexible or straight rigid reamers. The latter are less available and less forgiving. However, they conform to the shape of the nail better and are preferred if available. Piriformis start is preferred in most adult femurs unless there is a coxa breva or valga. In children with open proximal femoral physes, a trochanteric starting point is preferred to minimize the risk of avascular necrosis. Retrograde nailing is used in the femur in conjunction with angular deformity correction of the distal femur or if there is a quadriceps lag that needs to be tightened. Retrograde tibial nailing is used in patients with pantalar arthrodesis.
Dr. Paley’s surgical technique for the femur
- The patient is positioned supine on a radiolucent operating table. A radiolucent bump (usually a folded towel or sheet) is placed underneath the ischium on the operative side. This allows good visualization of the hip on both AP (anteroposterior) and cross-table lateral views.
- Using the image intensifier (fluoroscopy), the tip of the level of the greater trochanter is marked on the skin. Knowing the length of the nail to be used for the surgery, a ruler is used to mark the distal end of the nail.
- The level of the osteotomy is determined based on the amount of distraction planned. It is important to end up with the larger diameter of the nail always engaged on both sides of the distraction gap at the end of lengthening. Assuming one wants to have 2cm of the larger diameter of the nail engaged, then add 2cm plus the 3cm of smaller diameter nail, which is exposed plus the distraction amount. This total measured from the distal end of the nail represents the level of the desired osteotomy that will leave at least 2cm of the larger diameter of nail always engaged.
- Dr. Paley makes a 1cm incision laterally at the level of the osteotomy. Holes are drilled into the bone using a 4.8mm drill bit. Dr. Paley prefers one entrance and three exit holes: anteromedial, anterolateral, and medial. He then makes two more holes anterolateral and posterolateral at the level of the other holes. These holes will serve to vent the canal from fat emboli and to allow the reamings to spill out and help fertilize the bone formation at the distraction gap.
- Dr. Paley determines the starting point using a Steinmann pin in the piriformis fossa for adults or children with closed growth plates. The opening is enlarged using an ACL reamer. For open growth plates, the Steinmann pin is inserted into the tip of the greater trochanter.
- The fossa or trochanter is opened with an ACL reamer.
- A beaded guide rod is inserted down the femur.
- Reaming occurs in 1mm increments until there is “chatter” and then in 0.5mm increments. Reaming proceeds to 12.5mm for the 10.7mm nail and to 14.5mm for the 12.5mm nail.
- Dr. Paley prepares the nail for insertion. The PRECICE 2 nail is not modular and the length of the nail must be chosen in advance.
- Dr. Paley applies the proximal targeting device and tests its alignment to the screw holes by inserting the drill guides and bits.
- The nail is placed under the beam of the image intensifier to ensure that the mechanism is not pre-distracted. This image is saved for reference.
- The initial beaded guide wire used for reaming is removed, as the nail is not cannulated. Dr. Paley inserts the nail into the canal up to the level of the planned osteotomy (drill holes).
- One assistant will lift the foot off the table. The other assistant will lift the proximal end of the nail using the insertion guide. The two assistants are applying an extension moment to the femur to prevent displacement of the femur during the osteotomy.
- Dr. Paley uses a sharp osteotome to osteotomize the femur through the 1cm lateral incision. The femur will easily break through the six drill holes. Dr. Paley listens for the break and once it occurs will withdraw the osteotome. The femur is tested to ensure it fractured while maintaining the extension moment. The femur is moved gently into varus and valgus and Dr. Paley monitors this movement on the image intensifier.
- Once the break is confirmed to be complete, Dr. Paley advances the nail by gently hammering on the impactor until the upper end is at the level of the base of the piriformis fossa or just insider the greater trochanter, for piriformis and trochanteric nails respectively.
- The nail is locked proximally with two screws. For distal locking screws, Dr. Paley prefers to insert a long 1.8mm wire into the locking hole, followed by a 3.8mm cannulated drill for the distal 10.7mm nails and a 4.8mm cannulated drill for the distal 12.5mm drills. After removing the cannulated drill, a 4mm drill is used for the 10.7mm nails.
- The nail is locked distally with two screws. Dr. Paley avoids inserting the anteroposterior middle screw because it can act as a stress riser for fracture of the femur.
- The end cap is inserted into the proximal part of the nail.
- All incisions are closed.
- Dr. Paley inserts the ERC device into a sterile sleeve. The level of the magnet on the skin is marked using fluoroscopy. The ERC is applied directly over the magnetic spindle, using the image intensifier to mark out the magnet. It takes 7 minutes to lengthen the femur 1mm. The ERC is programmed for antegrade or retrograde use.
- Dr. Paley will check the distraction gap on the x-ray and compare it to the pre-distraction space. If an objective increase in space is seen, the procedure is completed. If not, Dr. Paley will perform a second millimeter of distraction to confirm. In the rare case where the bone does not separate, the nail must be extracted and tested on the bench and if it does not distract, then it is replaced with another nail. An incomplete osteotomy can cause a failure of distraction and can even lead to failure of the mechanism due to the high force of resistance.
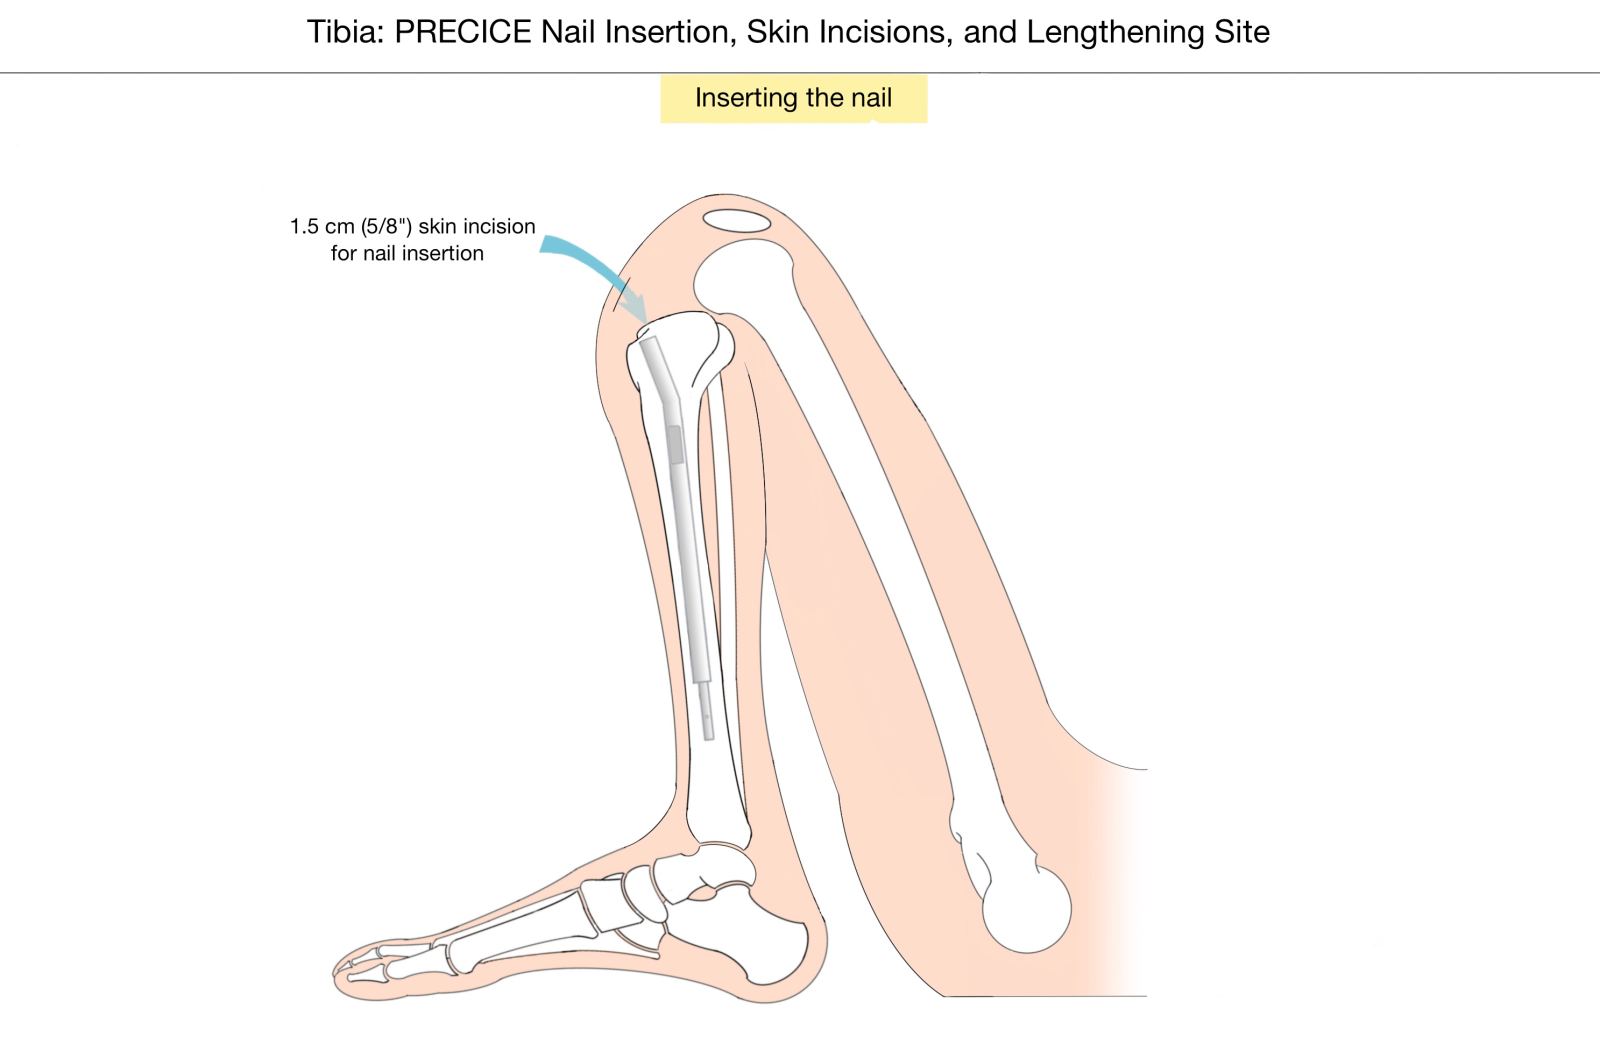
Dr. Paley’s surgical technique for the tibia

- The proximal and distal ends of the nail are marked, as before.
- The level of the osteotomy is marked, as before.
- Dr. Paley makes a single drill hole anteriorly at the level of the tibial osteotomy. He avoids the anterior compartment. Additional holes may be made medially and posteromedially under the subcutaneous border.
- Temporary arthrodesis screws are inserted just proximally to the distal tibio-fibular joint. Dr. Paley starts with a wire from the fibular side and makes sure it passes relatively posteriorly into the tibia. This wire should be oriented distally on the fibular and proximally on the tibia. A second wire of equal length can be used to measure the appropriate length of the screw. The wire is brought out the tibial side and then Dr. Paley antegrade drills using a 3.2mm cannulated drill bit. A solid (non-cannulated) 4.5mm screw, measured to the correct length, is inserted at the antegrade level.
- Dr. Paley makes a 3cm incision posterolateral in the midlevel of the leg. He dissects between the peroneals and gastro-soleus muscles anterior to the intermuscular septum. He dissects down to the fibula. The periosteum is incised and elevated off the lateral aspect of the fibula, and a Hohmann elevator is inserted anterior and posterior to the fibula. Dr. Paley then makes multiple drill holes in the fibula with a 1.8mm wire. He uses a narrow osteotome to break the fibula and confirms the osteotomy is complete by displacing it.
- Dr. Paley inserts a Steinmann pin into the proximal tibia at the level of the joint in line with the medial tibial spine, medial to the patellar tendon. He starts as high and posterior as possible. He uses an ACL reamer to open the starting point.
- The tibia is reamed in 1mm increments until there is “chatter” and then in 0.5mm increments until 12.5mm for the 10.7mm nails and 14.5mm for the 12.5mm nail.
- The tibia is osteotomized with a sharp osteotome.
- The PRECICE tibial nail is inserted down the tibia.
- Dr. Paley orients the upper end of the nail so that the upper medial locking screw is oriented towards the tibio-fibular joint. The screw is drilled into the head of the fibula. This screw is inserted to fix the tibia and fibula. This is important so that both bones lengthen in tandem. The second proximal locking screw is locked from the lateral side. If the first drill hole and screw misses the fibula, Dr. Paley will lock the fibula separately with another 4.5mm screw in a retrograde fashion using a wire and cannulated drill.
- Dr. Paley free-hand locks two of the three distal screws, leaving either the middle or distal one empty.
- A distraction test of 1mm is performed using the ERC.